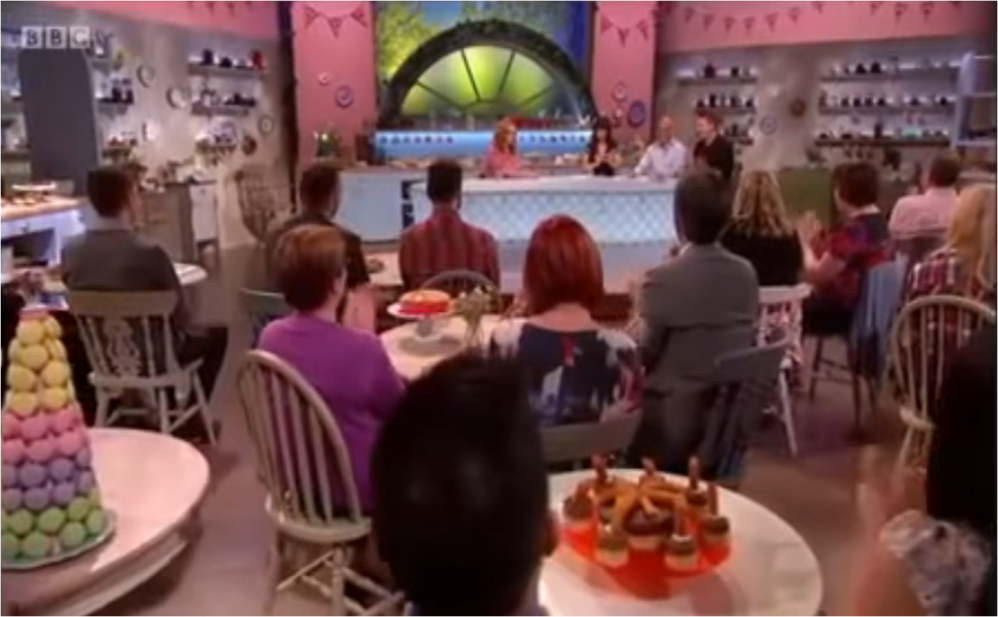
You might remember that I went to a filming of An Extra Slice back in September. You can read my account of the day by clicking here.
I took a cake along to the filming and the week’s theme was Patisserie. I scream inside! How can I ever make something to match the skills of the other Sunday Baking Club members? I sifted through my recipe books and all that kept popping up was macarons and choux pastry, neither of which I’m that good at making. It was this time that I returned to the Bake Off Patisserie Weeks of the past for inspiration. I wouldn’t have much time to bake either so my bake would have to be made across a 4 day period and eventually I settled on Holly Bell’s Neapolitan Ice Cream Petit Fours for my inspiration. To make it slightly more special, I decided to make a large version of the cake and use the individual ones to decorate.

Genoise seemed to be the obvious route to go down, especially for patisserie, however I don’t have much success using genoise so I settled on slightly thinner layers of a pink Victoria sponge, a set crème pâtissière, a chocolate sponge topped with chocolate ganache and a brandy snap 99 to make my Neapolitan Cake.
The method for making the large and individual cakes varies little, except from the crème pâtissière and assembly. And since I used the same recipes for both (except 1 slight difference which is made clear in the recipe) I have used the quantities I used when I made this cake. It comfortably makes 9 individual Neapolitan Petit Fours and an 8-inch Neapolitan Cake with quite a bit of leftover!
One of the best tools to make this cake is a very deep 8-inch loose bottomed cake tin with the inside lined with baking parchment. If you have acetate, feel free to use that instead however parchment does the job just as well. It helps to keep the edges straight, making it look smarter and fit for a patisserie window!
And it seemed to be approved by the BBC editing team as it got a good 3 seconds on the screen at the bottom! Look there it is!

Tracy from The Little Pink Kitchen (http://thelittlepinkkitchen.com/) made these Viennese Whirls using a recipe which you can find here. Tracy added chocolate and dried edible flavours as an extra!

Sarah made a Pithivier for the occasion to resemble Jo Brand (although it was unfortunate that she couldn’t attend that week!), read more here.
Becky made a Croquembouche which unfortunately collapsed in the studio! Read Becky’s experience here

Pink ‘Strawberry’ Cake Layer
175g margarine
175g granulated sugar
3 eggs
175g self raising flour
1/2 tsp baking powder
2 tbsp whole milk
Wilton pink gel food colouring
Preheat the oven to 180°C. Line the base of a 20cm sandwich tin with a circle of baking parchment and a 20cm square tin with baking paper, making sure that the edges will not fall into the sponge batter.
Place all the ingredients except the colouring into a bowl and using an electric mixer, whisk until it forms a smooth and even cake batter. Dip a toothpick into the food colouring such that you have enough food colouring to make a light pink mixture. The colouring is strong so start with a small amount of colouring and gradually add more until you get the desired colour.
Transfer the mix into the 2 tins, making sure you don’t overfill the sandwich tin as you want a thinnish layer. Bake the cakes until they spring back when you press them – this can take anywhere from 12 to 20 minutes for both layers.
Leave to cool in the tins for 5 minutes and then transfer to a cooling rack to cool completely. If you need to, level off the round sponge for a flat top.
Crème Pâtissière ‘Vanilla’ Layer
750ml whole milk
4 eggs
2 tsp vanilla extract
150g caster sugar
40g custard powder
100g cornflour
For the individual cakes only 1 tablespoon gelatine powder (this is the same as 1 sheet of gelatine)
If you are making the individual cake, either mix the gelatine powder with 75ml boiling water or soak the sheet of gelatine in cold water. Line a 20cm sandwich tin with 2 sheets of clingfilm and 2 20cm square tins with 2 sheets of clingfilm.
Place the whole milk into a large pan over a medium heat to warm.
In a separate bowl, whisk the eggs with the vanilla and sugar. Sift in the custard powder and cornflour and whisk again until it becomes very thick. Once the milk has warmed up, gradually pour onto the eggs whilst whisking constantly and return to the pan over the medium heat.
Whisk the crème pâtissière continuously until it becomes incredibly thick. It has to be thick or the cake may collapse. Pour half of the pastry cream out into the sandwich tin lined with clingfilm. Into the remaining custard in the pan, add the gelatine mix or gelatine sheet and whisk until it dissolves and then transfer into the 2 square tins. In both cases, spread out the custard into even layers.
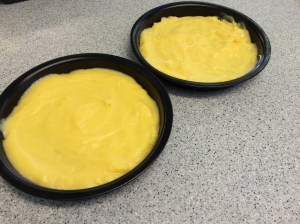
Cover the surface of each custard with more clingfilm and chill in the fridge until needed.
Chocolate Cake Layer
175g margarine
175g granulated sugar
3 eggs
200g self raising flour
1/2 tsp baking powder
2 tsp coffee granules mixed with 2 tbsp whole milk
40g melted chocolate
Preheat the oven to 180°C. Line the base of a 20cm sandwich tin with a circle of baking parchment and a 20cm square tin with baking paper, making sure that the edges will not fall into the sponge batter.
Place all the ingredients into a bowl and using an electric mixer, whisk until it forms a smooth and even cake batter. Transfer the mix into the 2 tins, making sure you don’t overfill the sandwich tin as you want a thinnish layer.


Bake the cakes until they spring back when you press them – this can take anywhere from 12 to 20 minutes for both layers.
Leave to cool in the tins for 5 minutes and then transfer to a cooling rack to cool completely. If you need to, level off the round sponge for a flat top.
Chocolate Ganache
180g dark chocolate, broken up into pieces
150ml double cream
For the ganache, heat up the cream until you cannot hold your finger in it for more than 2 seconds. Pour it over the dark chocolate in a heatproof bowl and leave for 2 minutes. Then stir it until the chocolate all melts and the ganache becomes smooth and silky. Allow to cool.
Buttercream
60g margarine
175g icing sugar
1 tbsp whole milk
Beat all the ingredients well until the buttercream is pale, light and fluffy. Place into a piping bag fitted with a star nozzle.
Brandy Snaps
110g margarine
110g granulated sugar
110g golden syrup
100g plain flour
1 tsp ground ginger
1 tsp lemon juice
Preheat the oven to 180°C. Line 2 baking trays with baking parchment and oil the handles of 2 wooden spoons.
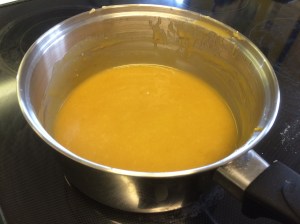
In a pan over a medium heat, melt the margarine, sugar and golden syrup until the sugar has dissolved. Once it has melted, turn off the heat and add in the flour, ginger and lemon juice until it forms a silky but not too runny dough.Then use 2 teaspoons to dot 4 rounds of the mixture on each tray, allowing lots of room for spreading.
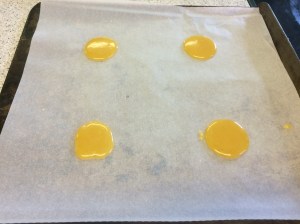
Bake for 8 – 12 minutes until the brandy snap is lacy and a dark golden colour. Cool for about a minute until the brandy snap becomes pliable without breaking and quickly wrap around the oiled wooden spoon handle, making sure it doesn’t unroll. Suspend over a baking tin to cool rapidly and then repeat with the rest of the brandy snaps. If the others have set, return to the oven to soften briefly. Ideally you’d have a helper here (thanks Vicki!). Repeat using up the rest of the mixture.
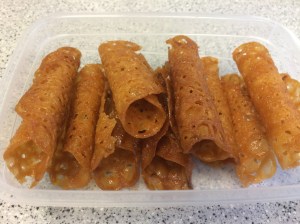
When the snaps are cool, transfer to an airtight container where they will keep for a week.
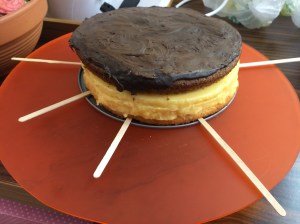
Assembling the Large Cake
Take a 20cm deep-loose-bottomed round tin and place a sheet of baking parchment or acetate around the inside edge. Then remove.
Start with the pink sponge. Remove the clingfilm from the crème pâtissière inside the sandwich tin and upturn the pink sponge onto the custard. Lift out the base from the 20cm tin and turn upside down onto the pink sponge. Flip over, lift off the sandwich tin and then remove the clingfilm. Put the base back in the tin and with the help of another pair of hands, place the baking parchment back around the sponge and custard. Top with the chocolate sponge.

Spread over some of the ganache so that it covers the top of the cake completely. To finish the cake, pipe small rosettes of the buttercream and push the brandy snaps down over the buttercream into the cake so it looks like a chocolate flake. (I couldn’t do this as the ganache was completely set and I didn’t want to break the brandy snaps or destroy the cake so I just arranged them on top). Chill for 30 minutes or until you want to serve.
To serve, push the cake out and then remove the parchment from the outside. (Now at Extra Slice, I stupidly didn’t bring anything to help lift out the cake like a palette knife so we had to improvise, thanks to Joyce and other bakers for helping with this!)
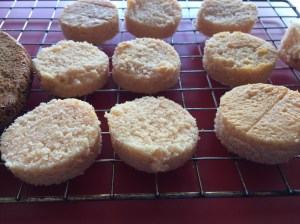
Assembling the Individual Cakes
Find some hard paper cupcake cups that you can easily peel away from the cakes – this just prevents any accidents when toppling over, however you could do this without them just as easily. Then find a round cookie cutter or pastry cutter that fits the cases well.
Cut out 9 rounds of sponge from the pink and chocolate layers of sponge in the square tins. Turn out the custard and remove the clingfilm from the square tins and using the same cutter, cut out a further 9 rounds of crème pâtissière.
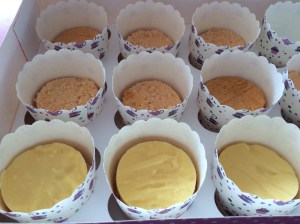

Into the hard paper cupcake cases, place the pink sponge and top with the set custard. Top with the chocolate sponge and spread the top with some ganache, leaving a slight gap around the edge. Pipe a buttercream rosette in the centre and push the brandy snap in so it stands tall.

You can see how the layers resemble a tub of Neapolitan ice cream. Once again thanks to Dominique for organising the trip to Extra Slice, this was a fantastic opportunity to test my skills and push my creativity! And it even made an appearance on TV!