Week 6 of Bake Off saw the bakers head east to a week celebrating all things Japanese (whether it did is a whole other issue…!) with Signature Steamed Buns, a technical Matcha Crepe Cake and a showstopping cake with Japanese flavours decorated in a kawaii style! For the first time in this year’s Bake Along, I will be taking on the Showstopper! I took inspiration from an iconic anime character as well as one of my favourite types of sponges and made this Totoro Matcha Chiffon Cake!

If you are unfamiliar with Totoro, Totoro is a character from the 1988 Studio Ghibli animated film, My Neighbor Totoro, created completely by Hayao Miyazaki. I myself have never watching My Neighbor Totoro but I know that Totoro is well-loved still to this day, over 30 years from when the film was first released. It is hard not to find some kind of Totoro merchandise in East/South East Asia either in the form of plushies, cutlery for kids lunchboxes or even clothing. I have often seen Totoro in cake form but one of my Patrons shared with me this Totoro Japanese Cheesecake Recipe and suddenly I knew that I wanted to try my own version!
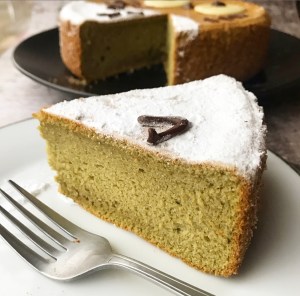
I decided to go for a chiffon cake, an incredibly delicate and soft sponge cake which is made using a meringue base. The cake involves whisking egg whites with sugar until they form stiff peaks and incorporating egg yolks, flour, matcha and then incorporating milk and oil by combining it with a small portion of the rest of the batter so the consistencies of both batters are similar which makes it easier to mix evenly. I bake the cake in a deep loose-bottomed 20cm round tin with the base lined with parchment but the tin is not greased. This allows the cake batter to stick to the side of the pan which promotes better rise on the cake.


For this recipe, I recommend preparing everything before starting to make the cake i.e. having the milk, oil and almond extract mixed in a bowl, the dry ingredients sifted and mixed together and the sugar weighed out in a bowl to add to the egg whites.
For the matcha chiffon cake:
- 85g egg yolks (approximately 5 egg yolks)
- 40ml whole milk
- 30ml vegetable oil (or any flavourless oil)
- A few drops of almond extract
- 120g plain flour
- 6g matcha powder
- 160g egg whites (approximately 5 egg whites)
- 120g granulated sugar
For the decoration:
- 50g white chocolate, melted
- 25g dark chocolate, melted and put into a piping bag
- Icing sugar, to dust
Preheat the oven to 150ºC. Line the base of a deep loose-bottomed 20cm round tin with parchment and set aside.
In a medium bowl, mix together the whole milk, vegetable oil and almond extract and set aside. In another bowl, sift together the plain flour and the matcha powder and use a whisk to combine evenly. In another bowl, have the sugar weighed out.
In a large clean and dry (preferably metal) mixing bowl, place the egg whites. Using an electric whisk, whisk the egg whites until they are like soft fluffy clouds. Add in about a third of the sugar and whisk until the meringue looks whiter and the sugar has dissolved. Repeat with the rest of the sugar, adding the final third only when the previous addition has been incorporated. Continue to whisk the meringue until it hold stiff peaks – that means you can lift out the whisks and the meringue will be firm and the end will not flop over.
Switching to a large whisk (I used the attachment from my stand mixer), whisk in the egg yolks into the meringue until evenly incorporated. Sift over the dry ingredient in two batches and use the whisk to quickly mix the dry ingredients in, being careful not to overwhisk and deflate the meringue. Switch to a rubber spatula so that you can scrape down the sides of the bowl.

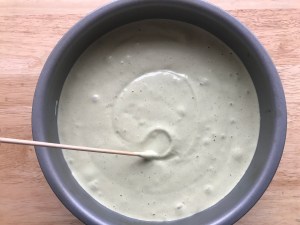
Use the spatula to add some of the batter to the milk and oil mixture and mix until the milk and oil are incorporated into that small portion of the batter. Add this mixture back to the large bowl and use your spatula to fold the two mixtures, working quickly and using large and quick motions. Scrape the batter into the lined cake tin. Run a knife or a skewer through the cake batter to get rid of any air bubbles and tap the cake tin on the work surface a few times; you should see air bubbles rise and pop.

Bake the cake for around 40 minutes or until the surface of the cake is a light golden brown, soft to the touch and a skewer inserted into the centre of the cake comes out clean. Return the cake to the oven and turn up the temperature to 170ºC and bake the cake for a further 3 minutes. Remove the cake from the oven and allow the cake to cool in the tin for about 20 minutes.
After 20 minutes, run a knife around the edge of the cake to free it from the side and push the cake out of the tin. Invert the cake onto a wire rack to cool and allow the cake to cool completely.
Meanwhile prepare the chocolate decorations. For the eyes, spoon out circles of white chocolate onto parchment paper. I found the best way was to spoon a dollop of white chocolate and shake the paper so that it naturally flattens out into a round shape. Pipe a large dot of dark chocolate for the eyeballs on each eye. Then using the dark chocolate, pipe an oval shape for the nose, 6 lines for the whiskers and 5 arrowhead shapes for his chest, piping spares of each. Place in the fridge to set up.

When you are ready to decorate the cake, make a stencil for Totoro’s belly by cutting out an oval belly shape from a piece of paper large enough to protect the rest of the cake. Place on top of the cake and dust the whole thing with icing sugar to make the belly shape. Then transfer the chocolate decorations onto the cake, adding on the whiskers, nose and eyes and the chest hairs, being careful not to move the icing sugar around too much.

Follow me on Facebook, Twitter and Instagram, subscribe to my YouTube channel and make sure to check out my most recent recipe for my Leftover Chicken and Stuffing Pasties!
Make sure to check out my other recipes for the Bake Off Bake Along:
- Cake Week: Chocolate Hazelnut Battenberg Cake
- Biscuit Week: Florentine Biscuit Bars
- Bread Week: Carrot Cake Soda Bread
- Chocolate Week: Nutella Chocolate Brownies
- Pastry Week: Leftover Chicken and Stuffing Pasties
- 80s Week: Brown Sugar Custard Doughnuts
- Dessert Week: Mini Apple Crumble Baked Cheesecakes
- Patisserie Week: Neapolitan Mousse Cube Cakes
- Final Week: Bounty Coconut Macarons
Also if you have enjoyed my recipes and my content, consider supporting me on Patreon; there you can find more information about Patreon, how you can support me and the blog and the perks that come along with that. Check out my Patron Appreciation Page while you’re down here too!


9 Comments Add yours