
Last night we watched the first episode of The Great British Bake Off on Channel 4 with Sandi Toksvig, Noel Fielding and Prue Leith. Prue set her first Technical Challenge of the series and did she choose a cracker (not literally a cracker, it was Cake Week after all)! She chose the kids party favourite, Mini Rolls!
The best selling brand has a chocolate sponge wrapped around a vanilla flavoured cream and covered in chocolate – I’ve had many of these in my time – and Prue’s had a peppermint filling! I decided to add my own twist to the best selling brand and Prue’s technical challenge by having a striking pink sponge inside to add contrast of colour; this sponge has a layer of strawberry jam as well as whipped cream and is coated in a dark chocolate glaze which has a crack when you bite into it and offsets the sweet inside.
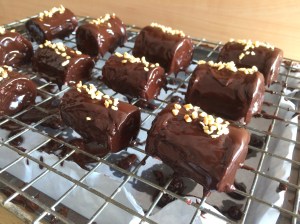
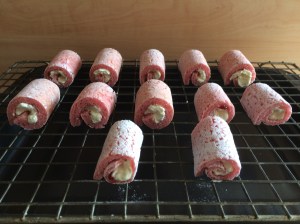
These are my Dark Chocolate and Strawberry Mini Rolls.

The sponge I use is a genoise sponge as opposed to the flourless sponge which Prue used. The sponge is coloured pink with liquid red food colouring which I incorporate in the whisking of the eggs and sugar. Because I want the sponge to be fairly thin so that I can roll it up without it cracking, I do not want it to rise significantly so I use plain flour as opposed to self raising flour which could make it too thick if it rose.
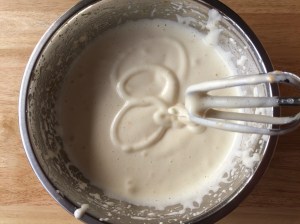
The only raising agent in this genoise sponge is the whisking of the eggs and sugar. Recipes will often call for the eggs and sugar to be taken to ribbon stage. This means that you will be able to draw a figure of eight using one of the beaters and the 8-shape disappears after a couple of seconds. The flour is then sifted over the sponge and I prefer to sift an even layer across the whole surface of the mixture as I have found it incorporates faster. When folding, unlike what you may have been told, it is essential to work quickly and with some power – the batter begins to deflate as soon as the flour has been added and you want to preserve the air and working faster does this.
Genoise sponges are not a fatless sponge, the sponge most commonly used for Swiss rolls. Because of the size of the mini rolls and the fact that the sponge layer is much thinner than your normal Swiss roll, the addition of melted butter or margarine prevents the sponge from drying out.
The best way to incorporate the melted fat is to take a portion of the batter after you have folded through your flour, add it to the melted fat, beat to combine before folding the 2 batters together. This method is preferred over simply adding the fat into the batter since the fat is of a different consistency to the cake batter and it will take longer to mix the two together evenly and you will rapidly deflate the batter upon adding the melted fat.
When it comes to filling the Mini Rolls, it is important not to overfill. Spread the cream all the way to the edge but leave a 1cm gap at the end so that the cream gets pushed there when you roll it up and the cream won’t come out at the end. The glaze is not just chocolate but rather a doughnut-style chocolate glaze which sets hard and will give that signature crack.

My tin of choice is a large straight sided roasting tin which measures 14in by 10in. If you don’t have a tin this size, use a similarly sized tin or any Swiss roll tin will do.
For the Genoise sponge:
2 eggs
55g golden granulated sugar
¼ tsp liquid red food colouring
52g plain flour
15g margarine, melted and cooled down slightly
For the filling:
50g strawberry jam
120ml double cream
2 tsp icing sugar, plus extra for dusting
For the chocolate glaze:
150g dark chocolate
2 tbsp golden syrup
2 tbsp margarine
Toasted hazelnuts, chopped, to decorate
Preheat the oven to 160˚C. Line the base of a large straight sided roasting tin that fits in your oven with baking parchment, making sure it comes up the sides slightly.
In a mixing bowl, whisk together the eggs and sugar using an electric whisk until it reaches the ribbon stage (see above). Add in the red food colouring and whisk until it is the colour of strawberry ice cream.
Sift in the plain flour so it covers the whole surface of the egg and sugar mixture and then using a spatula, fold through the flour working quickly until incorporated, scraping all the way to the bottom of the bowl. Remove a spatula’s worth of the cake batter and place into a bowl with the melted margarine and beat to combine. Then fold the 2 batters together until even.
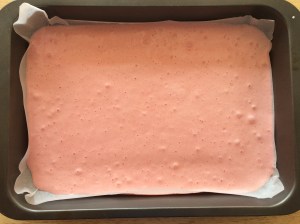
Pour the batter into the roasting tin with the bowl close to the base of the tin. Tilt the tin to spread out the batter, making sure it fills in the corners too. Bake the sponge for around 7-9 minutes or until it is firm and springs back to the touch.
While the sponge is baking, dust a sheet of baking parchment larger than the tin with icing sugar. Once baked, remove the sponge from the tin and place onto a cooling rack. In one movement, flip the sponge straight onto the icing sugar and peel off the parchment. Create a tight roll with the sugared baking parchment inside the sponge starting with the shorter side and leave to cool.
Meanwhile prepare the fillings. Beat the jam with a drop of boiling water to loosen. Whip the double cream and icing sugar until it forms a medium peak.
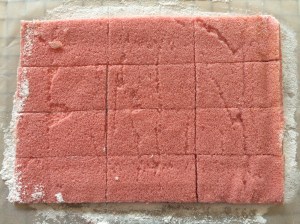
Trim the edges of the sponge and then divide the rest into 12 even rectangles. Spread a thin layer of the jam on each sponge and then spread an even layer of cream on each rectangle, leaving a 1cm gap at the end of each rectangle. Tightly roll up each of the mini rolls and then refrigerate to chill the cream.
Prepare the chocolate glaze by melting together the dark chocolate, golden syrup and margarine either over a bain marie or in the microwave in 20 second intervals until it is smooth and glossy. Leave to cool for 10 minutes.
Remove the mini rolls from the fridge and use a knife to smooth the cream at the ends if necessary. Space the 12 rolls out on a cooling rack set over a baking tray lined with a sheet of greaseproof paper.

Spoon the glaze over each roll one by one, spreading it with a spoon and letting the excess drip onto the tray, leaving the ends exposed at this stage. Repeat with all 12. Then carefully cover the exposed ends by filling the spoon with the glaze and pressing lightly on the ends. Repeat until all ends are covered and then check all the rolls and fill in any gaps with the leftover glaze or the glaze that has dripped onto the tray. Sprinkle on a single line of the toasted hazelnuts.

Leave the glaze to set at room temperature for around an hour until it doesn’t stick to your finger when touched. Then use a fork to lift the mini rolls off the rack and onto a plate/tray and refrigerate for a couple of hours until the glaze has set hard.

Follow me on Facebook, Twitter and Instagram, subscribe to my YouTube channel and make sure to check out my other Bake Off recipes too:
- Linzer Sandwich Cookies inspired by Biscuit Week
- Classic Sultana and Apricot Teacakes inspired by Bread Week
- Salted Caramel, White Chocolate and Lemon Savarins inspired by Caramel Week
Also if you have enjoyed my recipes and my content, consider supporting me on Patreon; there you can find more information about Patreon, how you can support me and the blog and the perks that come along with that. Check out my Patron Appreciation Page while you’re down here too!


7 Comments Add yours