
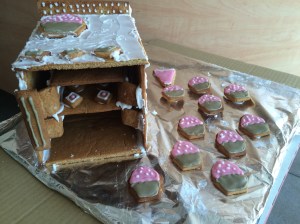
Inspired by The Great British Bake Off’s Biscuit Week Showstopper in which the bakers made a 3D gingerbread story containing at least 8 characters or objects, I decided to have a go at the challenge myself, by making an oven completely out of gingerbread.
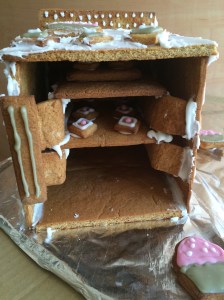
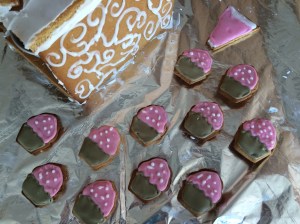
My Gingerbread Oven is currently baking 10 gingerbread diamond biscuits and has already baked 12 gingerbread cupcakes which have just been iced with a gingerbread piping bag. It’s got 2 baking trays inside it, both of which are on their own oven racks which are freestanding.
And while the bakers on the show had 4 hours, I managed to do this in about 5 and a half hours. I didn’t even draw up a plan before baking my first ever batch of gingerbread biscuits, I just went along with it and worked it all out in my head and somehow it all managed to come together. I have since refined my plan and written out my measurements so that you can also construct your very own gingerbread oven.
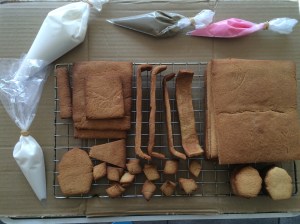
Before you start the bake, create your templates. I recommended using white card which is sturdier than paper, easier to work with and cut out and you can write the sizes on it and what they are used for. You will require the following templates in the correct size:
- A 17.5cm by 15cm rectangle for the oven panels
- A 20cm by 3cm rectangle for the oven shelf holders; you might find it useful to mark 2.5cm in from each side.
- A 9cm by 13cm rectangle for one of the oven trays
- A 7cm by 9cm square for another of the trays
- A 2cm by 7cm rectangle for the oven hinge
- A triangle, 6cm high and 5cm wide; you will get the sides by measuring 2.5cm in from the base of the triangle, measuring 6cm up and joining the points to make your piping bag
To build the gingerbread oven, you will need the following of each piece (note that the additional measurement is the thickness of the gingerbread dough):
- 5 panels, measuring 17.5cm by 15cm by 0.5cm
- 4 oven shelf holders, measuring 20cm by 3cm by 0.5cm
- 1 oven tray, measuring 9cm by 13cm by 0.5cm
- 1 oven tray, measuring 7cm by 9cm by 0.5cm
- 1 hinge, measuring 2cm by 7cm by 0.5cm
- 1 triangle, measuring 6cm high by 5cm wide by 0.5cm thick, and a jagged effect is cut off after baking
Additional gingerbread pieces and equipment that you require are:
- 21 gingerbread diamonds – these can be made from scraps of the dough, being rerolled to 0.5cm thick and cut at an angle of 30º from the bottom corner.
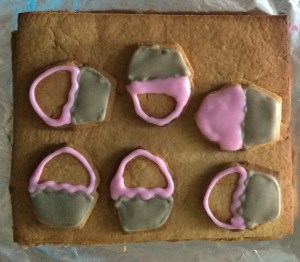
- 11 small cupcake cutouts
- 1 large cupcake cutout
- 4 tall glasses – these will be used to hold up your gingerbread panels while the royal icing sets and the oven is being constructed
- 4 piping bags
- A clean plastic ruler
- Small baking moulds that are around 5cm tall – these will hold your racks in place while the icing sets
- A large serving board – I just used a large piece of cardboard covered in foil
- A large sharp knife
You will need the templates even after you’ve cut out your shapes; gingerbread has a tendency, as with most biscuits, to spread slightly, giving your biscuits an uneven edge which makes construction impossible. So once your bring your shapes out of the oven, you need to bring back your templates and trim them back down to size. It might only be a couple of millimetres but it gives the final construction a neater finish.
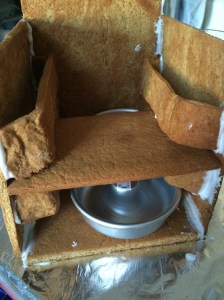
By far the trickiest part is the oven racks, not only getting the shape but keeping them freestanding. To get the correct shape, you need to support the gingerbread in the oven and you do this using foil. Take a sheet of foil that is 20cm wide and the full length of the foil from the box. Fold it up into quarters lengthways so you end up with a long strip of foil. Place the gingerbread onto the foil and fold the foil over so the dough is concealed. Then fold up the edges, giving yourself a handle shape. These will then keep their shape in the oven when they bake as the foil is strong enough to hold it in place and when it comes to assembling, you need to rest a baking tin under the racks so they don’t collapse under gravity.
I use royal icing as my edible glue for my oven. You will often find that substitutes such as meringue powder or powdered egg whites are used because of health reasons. Once royal icing dries, it lasts a long time! It’s firm once set which gives strength to the structure. You’ll often find glycerine being added to some royal icing recipes but since this is being used for the main structure of the oven, I omit it as it would make it too soft.
My technique for icing the cupcake biscuits is based on the flooding technique, except I don’t do any flooding. Flooding is a process in which a thicker icing is piped around the border and allowed to set to create a wall which will hold in icing. A thinner icing is piped in and shaken out to cover the rest of the biscuit but will stay inside the border, giving a flawless looking piped biscuit. I copy the first part before piping in the same icing and using a cocktail stick to spread it into the gaps after shaking it from side to side.
Here are some of the other challenges that I have already tried from Bake Off 2016 so far:
Cake Week Technical: Jaffa Cakes
Biscuit Week Technical: Coconut Viennese Whirls
Gingerbread Biscuit Dough
375g margarine
300g granulated sugar – you can also use muscovado sugar!
150g golden syrup
900g plain flour
3 tsp bicarbonate of soda
6 tsp ground ginger
3 tsp ground cinnamon
3 tsp mixed spice
Royal Icing
1 egg white
250g icing sugar
2 tsp lemon juice
Water Icings
240g icing sugar, split into one 120g and two 60g portions
Red, green and pink gel food colouring pastes, I used Wilton
For the gingerbread biscuits, melt the margarine, sugar and golden syrup together either in a saucepan over a medium heat or in the microwave until most of the sugar has dissolved.
Pour it into the weighed out dried ingredients in a large bowl and either using a mixer or a rubber spatula, bring the wet and dry ingredients together until it forms the gingerbread dough which is fragrant, even, firm and not sticky and a deep brown colour. Give it a brief knead on a lightly floured surface and split the dough up into 6 even pieces. Wrap them all up in clingfilm, flatten into discs and chill for 20 minutes.
Preheat the oven to 200ºC. Line a few baking trays with a sheet of baking parchment.
Take one portion of the dough, give it a brief knead on a lightly floured surface and roll it out to 0.5cm thick. Stop the dough from sticking by lifting it up and moving it around every so often. Use your panel template to cut out a panel, leaving room to also cut out some cupcakes. Bring the tray over to the surface and lift up your panel onto the tray. If it cracks or moves, push it back into shape and seal up the cracks.
Repeat with the rest of the dough, cutting out all of the required pieces, rerolling any scraps of dough you have. Once you fill your trays, chill them for 10 minutes before baking in the preheated oven for 8 minutes until the gingerbread has turned a darker shade of brown on the surface but isn’t burnt around the edges. Trim the panels using the sharp knife and your template to give them neat edges.
Leave them to cool on the tray completely before moving to a wire rack.
Meanwhile prepare your icings, starting with the royal icing. Place the egg white into a large clean bowl with half of the icing sugar. Beat it with a wooden spoon until all of the icing sugar is mixed in. Add the lemon juice and the second half of the icing sugar and beat again until it is thick and holds itself on the spoon. Place into a piping bag, twist the top and tie it with an elastic band.
For the water icings, gradually add water to the 3 portions of icing sugars so that you have a thick icing that can be piped. Colour one of the small icings pink for the cupcake top and colour the other one brown using red and green for the cupcake itself – you can do a light golden colour for a vanilla cake instead. Leave the larger icing white. Place all 3 into piping bags, again twisting the top and tying with an elastic band.
When you are ready to assemble your oven, start by getting your serving board ready. Cut off a 3mm hole off the end of the water icing bags and a 5mm hole off the end of the royal icing. On the base of one panel, pipe a border of the royal icing and stick it on your serving board. Leave to set while you ice the cupcakes.
With the brown icing, pipe a border around the bottom half of the cupcakes, making a jagged pattern on the top edge, to represent the cupcake case. Repeat for all 12 and allow to set. Then pipe some more of the icing inside the border and use a cocktail stick to spread it out to fill the gap and allow to set again. Then do the same for the pink icing for the buttercream. Do the same for the triangle piping bag.
To assemble the first part of the oven, take 2 of your panels and pipe icing along the bottom edges of each. Push the walls against the bottom piece and stand your glasses against the walls to hold them out. Wait until they are set.
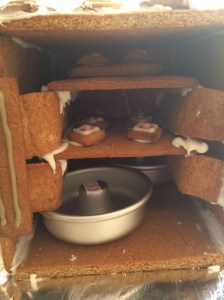
Finish off your cupcakes by piping dots of the white icing on the pink parts of the buttercream. Use your royal icing to stick the gingerbread diamonds on the base of 4 of the mini cupcakes, which will add height. Prepare your baking trays by piping royal icing onto the base of the gingerbread diamonds and sticking onto your 2 baking trays. Decorate them with icing as you wish. Set aside.
By this time, the walls should be set, so attach the back panel by piping lines of the royal icing along the edges where it will stick and pushing firmly, again using the glasses to help prop it up while it sets.
For the oven shelves, place the baking tins on the base of the oven that are around 5cm high. Pipe icing onto the end edges of the rack and push the rack against the side panel such that it rests of the baking tin. Repeat for the other side and then pipe royal icing onto the edge facing up and stick down your larger baking tray. Then do the same for the other racks except this time they should rest on the baking tray, creating a sturdy support network. Stick the smaller baking tray on top and leave it all to set.
Place the final panel on the top and then go over all of the edges with another line of royal icing and smooth it out to secure the structure. Decorate the oven as you see fit; I chose to cover the top and one side with the rest of the royal icing, attaching 3 diamonds to act as knobs, and the large cupcake on the top. Then I used the white water icing to create a curl pattern on the other side. I also attached the last rectangle onto the front of the oven, piping two lines to represent a hinge.
Lastly you should be able to remove the two baking tins from inside the oven and the structure should hold nicely. You can leave them in there if you wish.
And there we go, we’ve made an oven completely out of gingerbread!


This is actually really cool! 🙂
LikeLike
Haha I’m so glad it all worked out, the racks and shelving was by far trickiest!
LikeLiked by 1 person
I bet!! It looks pretty good though! Very creative from the standard Gingerbread house 🙂
LikeLike
I’d really recommend using a sugar syrup made from just melting sugar, than using royal icing – it’s a lot lighter and solidifies pretty quickly, meaning once it’s stuck, it won’t come unstuck. Just a thought 🙂
LikeLike
Hi thanks for the comment! The oven remained sturdy even after a couple of days though the biscuits did soften (naturally) but caramel is a lot more temperamental for me and I’ve made royal icing lots before so wanted to stay with something I knew! 👍
LikeLike